If you’re looking to decorate your home but not sure of what flooring to go with, ceramic tiling is an option worthy of consideration. This is essentially a tile made from clay that has been permanently hardened by hear, whilst it usually boasts a decorative glaze that’s extremely pleasing on the eye.
Glazed ceramic floor tiles offer considerable advantages to home-owners too, particularly as they have a hard, protective top layer that makes the surface impervious to water and staining. Both glazed and unglazed tiles are tough and durable too, with a quality installation capable of lasting for hundreds of years.
In the post below, we’ve provided a step-by-step guide to laying ceramic floor tiles in your home whilst suggesting what equipment you may need.
Get the Measurements Right
Before you start, you need to measure the floor space and note the width of the toles that meet the wall.
This is extremely important, as you should never have less than half of a tile’s width at the wall. If you do, you’ll have to adjust the layout until you get an adequate end tile size.
To ensure that you record accurate measurements, you need to ensure that you use the very best equipment. RS Components sell high quality linear tape measures, for example, which provide incredibly reliable measurements that enable you to plan your project to the finest detail.
Use a Notched Trowel to Spread Out Mortar.
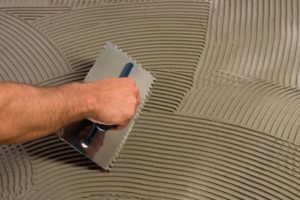
On the subject of equipment, you’ll also need to use a notched trowel to spread thin-set mortar over a 3×3 foot section of the floor (preferably at the intersection of the layout lines).
Trowels come with variably-sized notches, however, so compare the market carefully and don’t be afraid to seek out a manufacturers’ or suppliers’ recommendation before completing a purchase.
It’s also important that you work in small, square sections as suggested, as this ensures that the mortar does not harden before the tiles are laid. You can work in smaller spaces than 3×3, but just note that this may take you a little longer to complete the project.
Lay your Tiles and Be Sure to Use Plastic Spacers
At this stage, you can begin to lay tiles at the centre point of the two layout lines, setting each individual tile in place by tapping it gently with a rubber mallet.
You should continue to lay tiles until you’ve covered the 3×3 mortared areas, before moving on the to next section and continuing the process. You should then proceed until the end tile has been fitted, whilst using plastic spaces at each corner toles to maintain the layout and even grout lines between each tile.
Don’t forget to wipe away any excess grout or debris when you’re done too, as this will create a smoother and more impressive finish that’s easy on the eye.
At this stage, you should have an even and high-quality installation that’s both stylish and durable. Just don’t be afraid to ask for help when you need it, or at least consult with YouTube for some much-needed visual guidance!